GARDEN COOP
Day Zero - February 11, 2017
 |
| Behind the garage/shed is the designated location for the Garden Coop. Picture from Summer, 2016 |
 |
| Hand-made stone, which bordered vegetable, herb, and flower beds, and the concrete bench were removed for later use. |
Day One - February 16, 2017
 |
| The vinyl siding was removed from the back of the garage. The exposed OSB was later painted. |
Day Two - February 17, 2017
 |
| Three 4x4 pressure-treated posts were set in the ground with concrete and screwed into temporary braces to hold the posts straight. |
 |
| Three walls were built from 2x4s on 16" centers. The day ended with a fire in the chimney. |
Day Three - February 18, 2017
 |
| The 4 x 4 posts were cut level using a skill saw. A base of doubled 2 x 6 pressure-treated wood sit on these posts. The stud walls were installed. |
 |
| The retaining wall of pressure-treated 2 x 6s were screwed in. Front view |
 |
| For landscaping purposes, pest and predator control, under-pinning of p.t. wood scraps were screwed into place. |
 |
| The rafters and plywood are up! Landscape ideas are being formulated. |
 |
| The chicken entry door, window, and human door were framed. |
 |
| The dirt floor inside the coop was filled in behind the retaining wall. |
 |
| Black paper was nailed down on the roof just in time for light showers. Metal roof edging installed, then good progress was made on the vinyl siding. |
 |
Redwood stain was painted on the retaining wall, under-pinning, around the pop door and ventilation openings at the rafters, as well as around the window and (human) door frame. Half of the roof shingles went on before a storm passed through.
|
Two coats of redwood stain was painted on pressure treated wood for maximum durability and eye appeal.
 |
| 2" x 4" studs for framing |
 |
| 4" x 4" posts for run base |
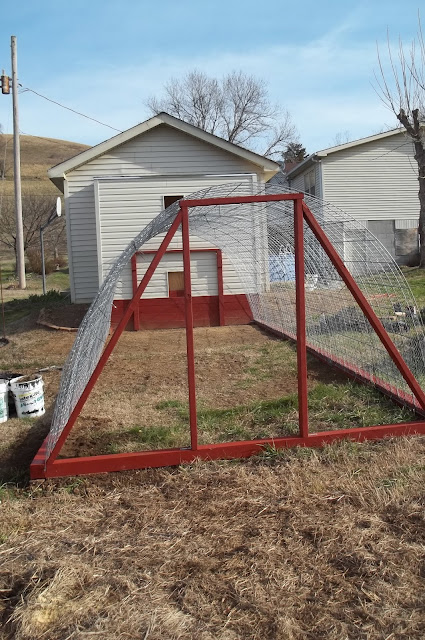
Day 11 - March 4, 2017 The Hoop Run
The base required four 4 x 4 x 8, and three 4 x 4 x 10 for a run of approx. 237 square feet.
 |
| To start the run base, two 4 x 4 posts were attached to the retaining wall's lower corner with 3.5" corner brackets. |
 |
| 18" rebar was pounded into the ground on each outer side of the 4 x 4. This holds the base in position once the outward pressure from the hoop is applied. The butted ends were held together with a metal plate on the inside and outside of the posts. |
At the end of the parallel line of posts (where the Run Door will go), a 4 x 4 x 10 was cut to fit horizontally inside the parallel posts. At each end of this inner post, to accommodate the edge of the cattle panel, a notch was cut of approx. 1/2" wide x 2" deep; installed notch side up. A corner bracket secured the end post to the parallel posts on the inside corners.
[No pictures.]
THE HOOP
Required six 50" x 16' cattle panels, sixty 1.25" washers, sixty 2.5" sabers, 100 feet 48" poultry hex netting, heavy duty zip ties, 17 gauge wire for tiesPoultry hex was attached to each flat cattle panel secured on the ends with zip ties; the jagged edges bent around the 50" width, stretched to the corners
 |
| To attach the cattle panels to the run base, screws with a washer were installed along the entire parallel top and bottom of the cattle panel ends. |
THE RUN DOOR-FRAME AND END-FRAME
 |
| Studs were cut and screwed together for the door frame. A corner bracket secured the frame at the base. To attach the hoop to the door, a screw and large washer on each upper corner of the door frame. A brace on each side of the door was mitered and screwed in. On the opposite end, on the coop side, studs and a cross bar was screwed at the retaining wall to support the hoop and retain shape of the hoop. A screw and washer secured the hoop to the cross bar. |
 |
| Very rewarding to see the run come together! |
Day 12 - March 8, 2017:
 |
| The Grazing Frames were screwed together. 1" x 1" x 24" welded wire was installed using washers and screws. |
 |
| Size of two grazing frames are 2' x 8' x 4". |
For more details on the grazing frames, see the page on this blog, Grazing Frames.
 |
| The Run Door was cut using 2" x 2" p.t. studs screwed together; corner brackets were used on four corners of the main frame. |
 |
| Perch at nest boxes |
 |
| The nest boxes were installed. To take advantage of the space above the nest boxes, a storage cage with door was built in. |
 |
| Three roost bars were installed using stud holders. 4" side up. |
 |
| A bridge goes from the roost bar to the high nest box perch. |
 |
1" x 1" welded wire was used in the window.
Two coats of redwood stain was painted on both
sides of the door.
|
 |
| The Coop Door was made with 1/2" pressure-treated plywood, framed with p.t. 1" x 4" planks. |
Day 14/15 - March 10-11, 2017
 |
| The Coop Door was hung. A handle, hook and eye on the inside of the coop door, and a slide bolt closure on the outside of the coop were installed . Welded wire covered the ventilation at the roof line. |
 |
| Hardware cloth was installed across the expanse of the lower end of the run. The Run Door was covered with hardware cloth, hinged, and hung. The Grazing Frames were placed in the corners of the run along the parallel base. |
 |
| Roll metal fascia was wired to the cattle panel to fill the gap between the coop and the hoop, which was caused by the sloping land. The tarp cover was wired to the metal fascia. |
Day 16 - March 12, 2017
The grazing frames were seeded and the seeds were covered with a layer of the compost; rain watered in the seed. 4" x 36" pieces of hardware cloth were wired in where the 48" poultry hex did not cover the 50" cattle panels and which is not covered by tarp (not pictured).
Day 17 - March 16, 2017
The grazing frames were seeded and the seeds were covered with a layer of the compost; rain watered in the seed. 4" x 36" pieces of hardware cloth were wired in where the 48" poultry hex did not cover the 50" cattle panels and which is not covered by tarp (not pictured).
 |
| The ramp to the chicken coop was built and stained. An 11.5" long 4" x 4" post was used to elevate the ramp. Using scrap materials! |
 |
| The dust bath box was filled with play sand and wood ash. It was later placed under the ramp to the chicken coop, and much enjoyed there! |
 |
| Stone was laid around the base of the run, and grass clippings were spread on the run floor. |
 |
| A large, swivel hasp and small slide bolt was installed on the bottom of the Run Door |
 |
| Wire ties secured the poultry hex and hardware cloth to the cattle panel. |
 |
| The 18 hens have moved in! 3 Rhode Island Reds, 3 White Leghorns, 1 barred Plymouth Rock, 2 red and 3 black Sex-Links, and 6 Black Australorps |
And, in the following days:
Around the run for security against predators
The fencer is plugged in at the garage. Romex NM-B wire connects the fencer to the cut-out switch, which is screwed into the end of the retaining wall. Don't forget to ground it!
 |
| This on-off switch is convenient when we need to go in the run. |
 |
| Fiberglass posts were nailed to the run base with 1.5" staples or metal straps were used when necessary. |
 |
| On the Run Door side, wood post insulators were screwed into the door brace. A gate crosses the front of the Run Door and overlaps the fence. |
 |
| An unused piece from a slide bolt assembly holds the gate post and was the perfect size. |
ROOST LADDER
A ladder to the roost was made from a 1" x 4" pressure-treated plank. 1"x 1" treads were secured with small panel nails. The lower end of the ladder is 1.5' from the coop floor, screwed into a cross piece between the studs. The upper end of the ladder was fitted with metal brackets, which were screwed into a roost bar.  |
| The ladder sits 10" away from the coop wall, and does not interfere with the function of the Coop Door [hinge visible to right of photo]. |
CHICKEN RUN FLOOR:
 |
Brown sand was used on the run over the dirt. Once the sand was turned under by the chickens, pea gravel and creek gravel was a better choice. More grazing frames were added for a total of 15.5' on each side. Ten buckets later, the run has a good base, which is sure to hold up through many rains. |
LADDER PERCH AND "BUFFET BOARD" |
| A ladder for perching in the run is ready to stain while a 12"H board the length of the run awaits installation. |
 |
| The purpose of the divider board is to keep lawn clippings from being scratched into the grazing frames and over the entire run. The sand-covered floor from the divider board to the retaining wall is also where I hang feeders and disburse treats. Thus, the term, "Buffet Board". Update: 11/17/19 The buffet board was removed and replaced with concrete cap block. |
 |
| Landscape area on east side of chicken run. |
 |
| Brick, dry laid behind cap stone, serves as a retaining wall at the Coop Door. A stone entrance will be added soon, similar to that in the photo below. |
 |
| Viewing Bench with concrete stone I made. |
 |
| I bought this frame several years ago and have formed many stones since. I pour the select shapes I want on a tarp, then place them after they dry. |
 |
The east side of the run is growing in nicely. Next year, and for years to come, the three Rose of Sharon bushes will give shade from the morning sun. Stone in front of the south-facing door to the run looks welcoming! Sun screens cover 84" of the upper part of the run on both the east and west side, making this area a favorite for the hens on a hot day!
|
 |
The west side garden area has 5 blueberry bushes somewhere among the flowers, okra, a mystery melon vine, and volunteer tomato. I learned a lot about planting sunflowers and marigolds around the run and so near the electric fence!
November, 2017 Two redbud trees were transplanted from the flower beds, where they had come up from seeds blown from trees in the yard on the west side of our house. These two trees were approximately 3.5' tall. Hoping to share pictures of them with leaves in the spring! 
The Coop Door was covered with a poster frame with its very thin piece of clear plexiglass. Screws were put in the frame; not ideal, but will work this winter.
Same for the interior window at the roost.
Note for Next Winter: Thicker plexiglass!
|
A tarp was installed with four eye bolts and carabiners to help deflect drafts coming from the pop door, which is left open at all times to the run. [The tarp runs along the back of the hen house and stops at the nest boxes, a canopy over the pop door, and just under the roost ladder on the other side.] Slanted in case a chicken falls from the roost or flies on, the tarp will be easy to take down when poop needs to be removed as it is under the roost bars.
In Tennessee, the sand is perfectly fine to stay uncovered on the floor throughout the winter; no need to use straw!


April 28, 2020 A pesky hen decided to scratch on top of the poop covered tarp, and it goes onto the floor, which means more work for me in clean-up. Since I do not wish to scrap the poop tarp every day, I came up with a solution I will call Poop Boxes. These are similar to the grazing frames, except I covered the frames with chicken wire instead of 1x1 cage wire. After removing old floor sand and putting in new floor sand, I placed a tarp on the sand, then placed the frames on top of the tarp.

Projects to complete:
Install handle inside run and hook and eye, so the run door doesn't blow open when I'm inside! [Yes, that happened.]
Article on chicken manure in the garden / compost:
https://blog.gardeningknowhow.com/guest-bloggers/using-chicken-manure-as-garden-compost/See also, page on this blog, Lawn Clippings: Silage for Chickens, if interested!
Insanely comprehensive :)
ReplyDeleteThank you so much,
Now I have something to read during the holidays. This will take a while but well worth it like always
You can read another one here Besttoolsbrand